Feeds:
Posts
Comments

Archive for the ‘Art Tutorials’ Category

Are you guys ready for some lovin’?  😉  If not, check out some of these last minute Valentine’s Day cards, signs, printables, and crafts.  So FUN aren’t they?!

V’day card from EnormousChampion.

These adorable Love Bug Valentine’s would be great for the little ones.  Find the bugs at the Dollar Store and get the jar printable at Dandee.

Martha Stewart knows how to really rock the card making!  I love these and they’d be especially easy with a dye cut machine.

This is a fabulous idea for a man bouquet!  Heather over at How Does She? made an ingenious bouquet out of mens socks for her guy this V’day.  So great.  You could probably also do the same kind of thing with underwear or t-shirts or ties.

Bakerella made these darling and simple cupcakes for V’day.  So sweet and easy even I might be able to pull off whipping these up!

Want a funny card/geeky/sci-fi card?  Check this out from the Wallaroo on etsy.  LOVE it.

Or this adorable card from Rifle Paper Co.

Make yourself a freezer paper stencil (like My Girl Thursday) and hand paint this shirt for your wife (or hubby).  🙂

Make a sweet clay heart pendant with Mitsy of ArtMind.

Speaking of clay, you could always go back to my clay rose tutorial and make some adorable vintage inspired rose rinds, earrings, or even refrigerator magnets for the special ladies in your life.

I saw this on Pinterest (follow me on pinterest if you’d like) and thought it would be another great freezer paper (or applique) project!  Spice it up a little bit tomorrow night!  😉  Or, if you’re NOT in the mood, create the other side to say “In Your Dreams”.

And of course, if you have a chance, doll yourself up and take some pin ups!  Your sweety will LOVE them! 🙂

I hope you all have a FANTABULOUS VALENTINE’S DAY!!!  See you back here in a few!

Read Full Post »

Hey guys!  I was perusing my blog and thought I’d do a quickie post on my favorite posts of 2011.  I know its a bit late in the year to do a post like this, but I was pretty much checked out for all of January so I’m starting my 2012 now.  🙂  So here they are, my favs from last year!  Oh the memories…

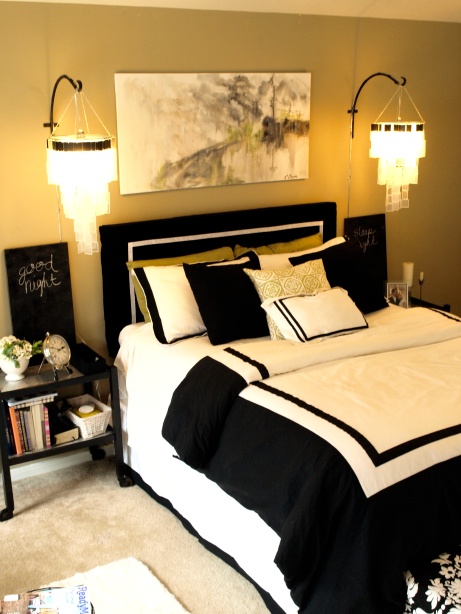
1) My master bedroom makeover.  I love it.  Its my favorite room.  Awwww.

2)  I LOVE my shoncho!  Easiest sewing project ever.

3)  And another easy sewing project that turned out great is my little maxi dress.  It doesn’t wrinkle and it hides my holiday weight. 😉

4)  This wasn’t the easiest project but I love the final result.  My wire deer head (Pinterest project).  It now hangs proudly over Sawyer’s changing table.

5)  The cabinet refinishing tutorial has been a huge success.  Its a simple process that ANYONE can do to spruce up outdated or beat up cabinetry in their own home.  Thanks to everyone for all the questions and comments!

6)  The post about my son’s prematurity was a tough one to write but I was overwhelmed by the love and support from all of the readers.  Preemie parents PRIDE!! 🙂

7)  My posterboard light fixture is still hanging proudly in my kitchen and I get comments on it all the time.  It hangs a little lopsided though and I keep telling myself that one day I’ll remake it and actually put the hole for the light bulb in the right place.  Haha!  Thats what happens when you’re trying things out for the first time!  Its imperfect, but its mine!

8)  This tutorial was fun and simple and I really like how it turned out.  I need to do more of these line drawings and stick them up in my little art gallery hallway.

9) This tutorial I did on how to make a chandelier with plastic placemats and a spatterguard from the Dollar Store made it all the way to Apartment Therapy!  Who knew?

10) And finally, probably the most fun I had doing a tutorial was when a few girlfriends came over to help me out with my Pin Up girl photo shoot tut for Valentine’s Day.  SO FUN and they did a GREAT JOB!

What a great 2011!  I can’t wait to do all the things I have planned for 2012!! 🙂  Ya’ll come back now, ya hear!


Read Full Post »

Howdy there!!  Welcome to 2012 (a month late)!!

After a long time away from my dear blog I’m back and ready to bring this thing back to life.  I’ve had a difficult time balancing the normal stresses and time constraints of motherhood, family duties, volunteer work, work work, and my extra activities but I’m determined to find some more time to post here because it makes me happy and keeps me sane.  So thats that.

For my sister’s 30th b’day I wanted to do something a little extra special.  I racked my brain for a while and visited Etsy and Pinterest in hopes of finding inspiration.  I make my sister stuff all the time, and didn’t want to bombard her with yet again another handmade doo-dad, but her hubby said that my handmade stuff is what she likes most.  She already has paintings of mine hanging in her house, she has plenty of jewelry from me, what else could I do.  Think.  Think. Think.  Browse.  Browse. Browse.  Ding!  Lightbulb moment.  I came across this amazing website called Simon’s Stamps.  My sister likes making handmade cards and such (she is super crafty and makes all kinds of adorable things) so it hit me that I could design her some custom stamps and get her some funky colored ink pads.  YES.  DONE.  Thank you Simon, I think I will.

But what kind of stamps?  Hmmmm…. After much scribbling and doodling and debating, I finally remembered that a friend of mine had once had a stamp of her face that she used on some of her price tags on her craft fair merchandise.  I remember thinking how much I coveted her cute stamp and how I needed to remember that for later.  Well hello later!  So I decided to make Christen (my sis) a stamp of her gorgeous face so that she could use it for her handmade stuff that she often makes for craft fairs and gifts for friends and family.  But then I thought she could probably use a stamp of her and her hubby to use on invitations and cards as well.  Needless to say, in the end I ended up designing and ordering 4 stamps:  One of her face, one of her and her hubby, one of their son (to add to her and her hubby’s if she ever feels the need), and one of their name.  Once I started designing them, I couldn’t stop!  I even ended up designing one for me and Daniel!  I also ordered her a few fun colored stamp pads to go with it.  Anyway, Simon’s Stamps is really reasonably priced, easy to use, and had quick delivery.  I’ll definitely be using them again.  Maybe I’ll make a custom pet stamp of her dog Charlie to add to the collection.  🙂

Well, would you like to know how I made my designs?  You’ll be surprised by how easy it was and once you know the tricks, you’ll be addicted and will want to make one for every face you know!

Okay then, here we go:

Cost:  $9 + depending on what size stamp you order (mine were mostly 1.5″x1″)

Supplies:

  • A good photo of the person’s face who you are making the stamp for.
  • Access to the internet (to use Picnik) or access to other simple photo editing software.
  • A printer.
  • A black marker.
  • A window.
  • A scanner (if you don’t own a scanner, you can do a bit more work on the photo editing and omit the “artsy” part of this project.  Or you can download a scanner ap on your phone and use that).

1.  First thing to do is find your photo(s).  I perused my sis’s facebook page to find the photos I used to create her stamps.

I used the one above (but I just gave her bangs since she typically wears bangs) for her individually portrait stamp as well as for her couple stamp.  Its about the only picture where her and her hubby are close together and he is actually smiling with teeth.  😉

The one below is the pic I used to create the stamp of their son Carter.  He seriously looks like the “Gerber baby” in this pic.  So cute!

2.  Now just simply save your photo to your computer and upload it to your photo editing program.  As you know I use Picnik, its cheap, easy, and I love all the features.  Open your photo up in your editing program.

If you need to, crop around the faces to get rid of the excess photo space.

3.  Play with the exposure and contrast a bit until you begin to see more defined lines.  What we’re trying to do is create somewhat of a posterized line drawn image.

4.  Now just use your “Effects” tools (if you’re using Picnik) to get as close to a posterized look as you can without losing too much detail.  Be conscious of the fact that you want the end product to really look like the person, so try to keep distinct characteristics present while editing.  I turned my pic to black and white, boosted the contrast (using “Boost”), and slightly posterized it by using “HDR-ish” and “Posterize”.

5.  Once you have a pretty good template made up that you think you can work with, save it and print it off.  *TIP* The larger you print the pic, the easier you will be able to “tweak” it with your black marker by hand.

6.  Now is where you summon up the courage to get a little artsy.  Take your printed image and another clean sheet of computer paper to the nearest window (or light box if you happen to own one).  Use a piece of tape to tape the image to the window and tape the clean piece of paper over it.

7.  Now, simply trace over the most prominent lines, smoothing out any rough spots or bumps.  Omit anything that just “muddies up” the design.  Do this IN PENCIL first.  Then, take down your pics and tweak your new design until you get it simple and smooth enough.  Then simply color it in with your black marker.  C’mon, its not that hard, I know you can do it!! 🙂

Above is what my design looked like after I had done step 7 and scanned it into the computer.

8.  Scan your new black and white design to upload it back on to your computer.  Be sure to choose “black and white” in your scan options (it will save a step later).

9.  Unless I wanted all those little white spots to be in my final stamp, I needed to “color them in”.  I did this by using Picnik’s “Doodle” tool which is basically a paintbrush to go over all my dark areas that needed it until I saw negative (white) space in all the right places.  I also used the “Posterize” tool at the end again to just round out any rough edges.

The end result and finished design was this!:

10.  Now simply save your new design to your computer and then follow the instructions on Simon’s Stamps page (go to “Custom Made Art Mount Stamps” in their sidebar, and decide how large you’d like your stamp to be).  Upload your design, order it, and wait for your friends and family to be amazed, thrilled, flattered, and impressed when you give them their very own custom portrait stamp!

Here is a look at the Schneider family stamped on paper:

So CUTE right?  Anyway, Christen LOVED her new stamps and I LOVED making them.  I hope you do too!

P.S.  These would make fabulous wedding or engagement gifts!  Also, you could use this same technique to create custom artwork (Warhol style?) and other fun stamps of all kinds of things, people, creatures, etc.  Go.  Stamp it up my friends.

Read Full Post »

Wowza.  I’ve been BUSY.  Due to the Christmas season that is now upon us I’ve been taking pictures of smiling families like crazy for their Christmas cards and such.  I’ve been photographing and editing with nearly every second I have that I can break away from my rowdy boys.  So, once again, I apologize for the lack of posts and hope to do better in the future.  P.S.  If you’d like to see all the photos I’ve been taking lately, visit www.caterawsonphotography.wordpress.com .

Anyway, so heres a few things to keep you busy while I finish up my photo season…

Check out this FAWESOME (fabulously-awesome) video tut on transferring photos to wood blocks.  SO FUN.  Plus, the way she put the vid together is GENIUS as well.

Then embellish a tshirt with a bleach pen!  See more on that here.


If you’re looking to make some awesome Christmas ornaments then check this salt dough recipe out and give her a whirl! So fun.  I’ll be making some for my tree for sure!


Have fun and we’ll see you later!  Happy Holidays!

Read Full Post »

Well I have been getting a lot of feedback on my newly redesigned master bedroom (thank you for all the nice comments!) and so I thought I’d better get the headboard tutorial up for those of you who are interested in DIY-ing one yourself.  This isn’t so much a tutorial on how to build an upholstered headboard (there are plenty of tutorials out there on that) but more how I handpainted the chevron-ikat pattern onto my plain white headboard fabric.   Since I’d never done anything like this before, I pretty much guessed my way through it so my headboard is far from perfect.  To be honest, I’m thinking about completely repainting it with my leftover fabric.  But, lucky for you, I can walk you through what I did right AND WRONG and you can learn from my mistakes and make yourself something beautiful.  The best part is you can use this fabric painting technique to paint anything, headboards, pillows, chairs, t-shirts, whatever.

Cost: Varies by project.  Mine cost about $18 for the fabric and paint

Supplies:

  • White or other light colored fabric.  I used 2 yards of white cotton twill (from Walmart for $5/yd) for my headboard.  Natural fabrics work best and allow the paint to bleed a little bit.
  • Craft paint in your color choices.  I used a limey green and a tealy blue.
  • Textile Medium.  To mix with the craft paint to make it soft like fabric paint.  (Or you could just save yourself this step and buy fabric paint instead).
  • A medium sized flat/square tipped craft paint brush.
  • A spray bottle with water in it.
  • A water bowl to rinse brushes.

Okay then.  Heres what I did:

1.  I first upholstered my headboard in the white fabric by staple-gunning the fabric around to the back of the padded headboard.  Then I layed my headboard flat on the table to start painting.

2.  Next I got a square tray I had (you could also use a right angle ruler if you have one) and trace the corners of it onto my headboard lightly with chalk.  DON’T use chalk to do this.  It sucked up my paint wherever it was and made some really distinct paint lines that I don’t love on the finished project.  You could try a pencil or just dots of the paint color you’ll be using to give you the guide you need.  I’ll be honest though.  I did this only for the top portion of my headboard and then got lazy and didn’t do it to the rest.  I wish I would’ve though because some of my lines got whompy because I was winging it without a guide.  Thats what I get for being an impatient crafter.

3.  Next, working in small sections, spray the fabric lightly with water.  I would recommend testing the amount of water you need to be spraying with the amount of bleeding you want to get on a scrap piece of fabric before you try this on the real thing.  I didn’t do this and learned as I went.  I got the right hand side of my headboard pretty soaked and then learned that “less is more” and so the left side has less bleeding (which I like better).  You probably only need to spray a section two maybe three times and no more.  You don’t want the lines to become tie-dyed looking, but you do want the colors to bleed slightly into eachother.

4.  Now, holding your brush so that the square tip is on its side (or that the tip of the paintbrush looks like a vertical line), dip your brush into the water and then into the first paint color (after mixing it with the textile medium per the instructions on the bottle).  Then follow your guide using up and down choppy strokes on your fabric.

5.  When you have a section done, switch colors and do the same thing with the next color except push that color into the first color a little bit.  You may have to give it a squirt with the water bottle if the fabric has dried.

6.  The ikat-ness of the design is dependent on how you’re holding your brush so practice first on a scrap piece until you feel like you’re getting the look you want.  Then paint your piece (in my case an upholstered headboard) alternating between wetting the fabric with the squirt bottle and painting on the lines in an up and down stroke.  (You can see in the image below where I wet the fabric too much and the paint bled a little more than I would’ve liked.)

And thats what I did!  I would like it much better I think if I did it again and really took my time.  But, hey, not too shabby for a first try I guess.

Anyway, hope you enjoyed the tutorial!  Learn from my mistakes and go do your own! 🙂

Read Full Post »

I walked into my master bedroom a couple weeks ago and thought, “BLECH.”.  Not that I haven’t loved the black and white neutral color scheme, I just got tired of it.  I blame it on the quarter-life crisis I seem to be going through.  I have been feeling very anxious and OLD and have been itching to mix it up a bit in my life.  I would do what I always do when I feel like this and just go and do something drastic to my hair, that usually seems to do the trick, but I PROMISED my hubby I would grow my hair out and wouldn’t cut it until it was about “boob length” (his words).  So, after flipping through my “Happy Chic” book by Jonathan Adler (it is so fun and dramatic),

I decided to spruce up my room with a younger, funkier, Jonathan Adler meets Domino Mag (I miss you Domino) vibe and some really happy colors. The problem, like usual, is that I don’t have much of a decorating budget so I had to get creative and try to use what I have as much as possible.  I knew the first thing I wanted to do is change the wall color.  I decided to keep it neutral and lighten it up so I went with a light gray.  This decision was also largely based on the fact that I happen to have a bunch of leftover gray paint from Peyton’s room that I knew I could lighten up and use.  I also knew I really wanted to make the walls come to life so I decided to take it one step further and paint subtle gray horizontal stripes on 3 of the 4 walls.  I thought this would be a BIG time consuming job, but it actually wasn’t that bad.  And the lines came out really crisp, even on my textured walls, thanks to this tutorial I found over at Living With Lindsay.  I did this all by myself so I imagine it would be much easier with a helper.  I figure my husband will be less annoyed by my constant redecorating if he doesn’t have to do any of the work, so I do things while hes not looking so he can be amazed at the result later! 😉  Anyway, my stripes are 11.5″ wide.  I simply measured from the baseboard up 11.5″, then marked it, and measured up another 11.5″, marked it again, so on…until I had marked off the whole 3 walls, putting marks every 4 feet or so.  Then I just layed the tape on the wall as straight as possible from mark to mark.  I’m sure its not perfect, but I’m impatient.  I think it turned out pretty dang straight actually.  I left the tall wall, opposite my bed, stripeless because A. The weird ceiling line would’ve made the stripes look off at the top, and B.  I decided to put bookshelves against that wall that would pretty much cover it anyway.

Well, I’ll just show you the pics and walk you through the rest of what I did….

As a reminder, heres what my master bedroom looked like before:

And heres what it looks like now!  SO much more fun and fresh I think.  And it definitely is a better reflection of me and Mr. Hubby’s style:

Didn’t the stripes turn out great?  I super love the subtle little FUN they bring to the walls.  So obviously with practically NO budget I kept all the original furniture.  The first and most noticeable upcycle is probablly the DIY’d ikat chevron headboard.  Yup.  I made that baby.  I looked and looked for cheap fabric that I liked and just couldn’t find any so I hit up Walmart’s fabric section and found some great white cotton twill.  Then all it took was a little craft paint, mixed with some textile medium, and a bit of creativity.  To be honest, I like but don’t love it.  I was too impatient and so my lines are a bit whompy.  I have leftover fabric so I might just do it again.  I dunno.  Anyway, the tutorial on that is coming soon if you want to paint your own!  (I’m sure you’ll learn from my mistakes and do a better job!)

I was happy to keep my lime green chairs and create a pallet around them so I distributed pops of green around the room.  But I also LOVE tealy-blue and threw that in there too, spray painting the nightstands, and adding other teal accents around the room.  Then I wanted just a little bit more so I added in just a few PUNCHES of tangerine orange.  It was tough to break out for my “4 colors in a room” box but I figured since gray, black, and white are really just neutrals in the background, 3 more fun colors wouldn’t hurt.  🙂

The black frames used in the pic above I got from BigLots for $5 for 2 (I also saw the same ones at Joann’s for $20 for 2 so I got a killer deal).  I just wrote on some canvas panels the letters to spell “ME” and “YOU” and flanked the room with them to fill up all the extra wall space surrounding my bed.

I debated for a bit on what to hang above my bed.  I didn’t want anything too busy to compete with the vibrant headboard and striped wall.  I thought about putting the framed “Me” and “YOU” there but decided I wanted something a bit more simple and small.  Also, I was afraid Daniel would think the room was getting too girly so I thought I’d throw him one and macho the place up by stealing the antlers (thrifted and painted for $4) from Sawyer’s nursery and mount those above the bed instead.  (Don’t worry, I just replaced them with the Pinterest project from this post and my wire dear head looks great in there).  I LOVE them in here.  I think they float perfectly inbetween my DIY’d hanging lamps and give just that touch of bohemian but in a sophisticated way.  Daniel likes them too.  Mostly because he says, “The bedroom is meant for mounting.”  Haha!  😉

Okay, I just wanted to talk about these pillows really quick!  Little orange guy is just some fabric I have wrapped around a pillow right now but I will soon get to sewing.  But the big gorgeous fringed beauty I found the other day at Home Goods in the clearance section for $7.  YES  $7.  You can’t even buy a down pillow form at the fabric store for $7.  I just love it.

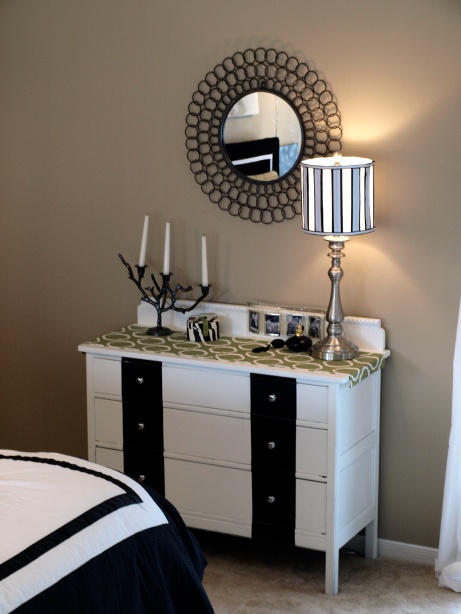
This is all pretty much the same.  I still want to do something more to that dresser.  Not sure what though, but it works great the way it is too.  The little teal lamp was on sale at Target for about $20.  The picture frame was also a Target buy on clearance for $2 as well as the new duvet cover set that was (my big splurge) about $60.

Above is a quick look from the other side of the room.  Below is a look at my bookcase wall that once was my gallery wall.  I ordered the white bookshelves from Walmart (in store they only had the 11″ deep ones and I wanted the 9″ deep ones) for $35 each.  They did site to store so I didn’t have to pay any shipping.  Originally I wanted to back them with some fun fabric or wallpaper (probably something black and white to allow the decorative accents to pop) but once I assembled them and got them up I realized I rather like them backless with the gray wallcolor showing through.  I’m not sure if I’ll leave them this way or decide to go ahead and back them, but here they are for now.  I’m still working on the styling, but heres the gist:

I am also debating on building legs for my shelves to stand on to make them look a bit more custom and give them more height on my tall wall.  I dunno.  I’ll probably just be too lazy. 🙂  Most of the accent pieces on the shelves were things I already had although I did pick up a few colorful vases and such at Hobby Lobby (50% off) and Ross.  I probably bought about 6 things all under $6 each.

And thats pretty much it!  I LOVE my new colorful funky room, and so does the hubby which is always a plus.  😉  I also mixed up some leftover paint from Sawyer’s nursery and am going to be painting my master bathroom shortly in a tealy-blue color.  Of course I’ll post it when I get to it!

A completely new look for under $300!  So happy.  So chic. 🙂

Read Full Post »

Hey guys!  I told you I’d give you all the printables I made up for my party and so here they are!  I made them all on Picnik so if you are feeling crafty, get on there and make up some of your own!  Enjoy!! 🙂  (Just right click and save to your computer and then print.)

First here is the banner I made.  If you’d like to make your own, you can use my bunting template found here and upload it to Picnik and add any letters in any font that you’d like.

Next I made a sign for the Creepy Photobooth I’ll be doing to get great pics of everyone in their costumes.

There were a lot of free printable tags out there but none that suited my needs so I made these little babies up.

(I left the bottom right label empty so you could fill it yourself in picnik if you wanted to.  Also, I just realized I spelled “labels” wrong.  Duh.)

Then I made this sign to put on the refreshment tables.

I also made this little sign to put on the voting box for our games and contests.

And there you go!  There are all of my FREE HALLOWEEN PRINTABLES for you to use at your Halloween bash!  I hope you enjoy!  Happy Halloween! 🙂

Read Full Post »

I don’t typically decorate my house much for holidays.  Not because I don’t want to, more because I can’t afford it usually.  And also, I figure if I decorate my house for every holiday that rolls around, I will never be able to appreciate it in all its un-decorated decorated glory.  But, after talking to my best friend Tiff the other day, I was reminded how much I used to LOVE Halloween and how much fun we used to have with it.  That inspired me to get back in the “fun” groove (as opposed to the “burned-out-irritable-just-trying-to-keep-myself-out-of-mom-jeans” groove that I usually feel like I’m in).  So I decided to throw me an adults only Halloween party!  I’m actually dorkishly excited about it.  I even made up a little poem for the evitations.  Ahem:

“Eeeekkkk!!!  Boooooo!!! 
We want YOU 
to join us for a fun night
of food and fright.
No children allowed
In our big kid crowd.
But come well dressed
in your Halloween best.
And you could win a prize
(or meet your demise).
So come if you dare
We don’t mean to scare.
We really truly hope
to
see
you
there!”

I know.  You’re stunned by my genius aren’t you.  I give you permission to use this if you decided to throw your own “Big Kids Boo Bash”.  Yes, that is what I’m calling it.  And yes.  I’m aware that I’m a gigantic nerd.

After I sent out the invites, I started browsing Pinterest (my latest online site obsession) for decor and food ideas.  I can’t believe all the cute and amazing things people are coming up with!  I’m blown away.  Anyway, that just made me more excited and so I made my way to my nearest Dollar Store to see what I could come up with.

Can I just say again how much I LOVE THE DOLLAR STORE.  It is a magical place.  Especially for Halloween items.  I found tons of decor and serving wear for my party and it was cheap cheap cheap.  I got home and got to work.  Even though my party is a couple weeks away still, I couldn’t wait to get the decorations up.  I’m totally in Halloween mode now.  I even found costumes for my hubby and I (he is going to be a scarecrow and I’m going to be a crow) at the thrift store this weekend with my sis-in-law Courtney.  I seriously want to just live in costumes for the rest of the month, thats how excited I am.

Anyway, would you like to see my decorations so far?  I used a lot of what I already had with a few things I made and several things from the Dollar Store.

Here is my mantel:

I made the bats by folding sheets of stiff black felt ($0.99 at Hobby Lobby) in half and then cutting out a bat shape (half a bat shape).  Then I folded the wings out and attached them to the wall with sticky tack.  Easy peasy and I LOVE it.  I made larger and smaller bats.  I didn’t use a template, but if you wanted to find one, just google image search “bat silhouette” and you’d find plenty.

I sketched the giant skull profile onto a black painted piece of mdf I had in the garage.  Its in white chalk so I can change it whenever I feel like.  I eyeballed it from an image I found google image searching “skull”.  Peyton calls it a “bone-head”.  Haha!

The Happy Halloween bunting banner I made from my bunting template and Picnik.  I LOVE the skeleton font.  So great.  I printed them on white cardstock and then cut them out and glued them to black cardstock bunting I cut out with pinking shears.  Then I attached them to white paper ribbon I bought at the Dollar Store.

The tombstones, spiderwebs, skulls, and creepy cloth all came from the Dollar Store.

I also made these big spiders out of crepe paper streamers and pipe cleaners.  I want to make a bunch more and have them crawling up my curtains in my living room.

Heres a quick look at my entryway.

Then Spiderman (aka Peyton) popped in to say “hi”.

And heres a closeup of my felt bats.

Pretty creepy huh?!  I’m super excited and can’t wait for the party.  Check out my next post for all of my FREE HALLOWEEN PRINTABLES I made for the party!!! 🙂  BOOOOOOOOOooooooooo!

Read Full Post »

Don’t have time to post today so I’ll throw out a few great DIY projects I found on Pinterest lately.  THEY ARE AWESOME and I can’t wait to try every single one…


First, check out this circle wrap skirt by The Crafting Chicks.  I love it because it can adjust to your size (if you are in the baby making phase of life like myself) and there is NO ZIPPER (which is also great since I’m not sure if I know how to sew in a zipper yet).  Yeah, I know the tutorial is for a little girls skirt but I figure it wouldn’t be too hard to make it for big girls too.


Then for a nifty decorating tutorial/inspiration, check out this honecomb-ish painters-tape wall treatment done by The Vintage Laundry.  Super fun.  Love it.

Then I LOVED this paint by numbers with Picnik tutorial by The Ambitious Procrastinator .  Completely AWESOME.  I’ve actually been wanting to do something just like this with Picnik for a while.  I LOVE the idea of using this technique to do a wall mural or a VERY LARGE piece of art.  VERY VERY COOL.


Anyway,  there you go.  This should keep you busy for a a bit then… 🙂  See you again soon!

Read Full Post »

Finally!  I’m back to post my Pinterest challenge project!  I was away for a funeral for a while and had to get back to regular life and catch up and of course it took me much longer than I wanted it too.  Anyway…

So I’m totally into this faux taxidermy trend.  I kind of love it and hope it sticks around forever.  In Sawyer’s nursery I have a pair of antlers (not faux…they’re the real deal) that I bought at a thrift store for $4 and spray painted white.   This is a pic from this post:  (Wow!  I need to get pics posted of Sawyer’s completed room.)

I also found a little porcelain cow bust at a thrift store for $3 that is now hanging on the wall in my master.  This is a pic of it from this post:

So even though I already have a couple of animals hanging on my walls, I couldn’t help but want to get some more!

For the Pinterest Challenge I went into my DIY folder and purused my past pins.  When I saw this image

I thought it would be the perfect project!  I was fully aware of course that my DIY version would most likely be uglier than this but I thought I’d give it a shot anyway.  Maybe the ugliness would add to the charm. 🙂

So off to Home Depot I went in search of some wire.

Heres the breakdown:

Cost:  About $6

Supplies:

  • Plenty of 16 Ga. Dark Annealed Wire (I bought the 2lb reel).  OKay.  So now that this project is done, I can tell you I HATE THIS WIRE for this project.  It is too stiff and hard to shape and really beat up my hands and fingers!  I suggest a covered clothesline wire or floral wire.  I saw some colored floral wire at the Dollar Store and am going to try it out again with that I think.  But, for the sake of accuracy in the tutorial, I used the 16 Ga. wire from Home Depot for this project.
  • Wire cutters.
  • Pliers or jewelry tools are helpful for twisting the wire ends.
And thats it.  Simple and cheap.  Now the fun part…
1.  The first thing I did was make a wire circle to use as my base.  Depending on how large you want your animal head you can determine the size of your base.  I also was sure to add a little loop up at the top of the base for hanging.
As you can see from the pics above, this wire made it hard to keep smooth and straight so my faux deer head turned out a lot more wobbly looking than the inspiration pic.  I just convince myself it adds charm.
2.  The next thing I did was build a neck.  I used 4 equal lengths of wire and attached them to the base.  I curved them slightly so that they weren’t sticking straight out of the base but concave in a bit as a neck of an animal does.  Then I made another circle (slightly smaller than the base circle) and attached it to the ends of the neck wires.
3.  Then I started building the head.  Following somewhat my inspiration pic, I built the head using curving pieces.  First, one coming up from the neck to form the chin piece, then two others curving down from the top of the head to the chin piece.
4.  Next I added a long piece of wire that connects all three of those new parts together.
5.  Then I added another wire that curved a bit and came down forming the front of the face from the base of the neck to under the chin.
6.  See how its starting to kinda look like something?  Even if it is a little whompy.  😉  Then I added a couple more curvy piece to either side on the center wire on the face and made and added ears.  From here you could probably make this into a variety of different horned creatures.  Although I originally wanted to copy the inspiration image and make swirly cool horns like that, after several attempts, it just wasn’t working for me and I decided to make my little guy a deer instead.  Maybe if I had used easier wire, I could’ve done it.  Meh.  Another day…
7.  Next I made the antlers.  To do this I took two really long pieces of wire cut to the same length.  I folded them in half (at the same time), and started forming the “branches” up the sides of each.  Then I pulled them apart and attached them to the top of the head inside each ear.  I had to mess with them a bit to get them to look somewhat symmetrical.
8.  Then I stepped back and took a look and decided the face needed a little more so I added a cross wire across the nose of the face and also decided to give him nostrils.   This was the finished result!
What do you think?!  Like I said, not nearly as pretty as my inspiration Pin but I love him nonetheless. Just take my advice, get some really good wire cutters and really pliable wire if you decided to do this one!
And thats it!  Thats my first Pinterest Challenge project!  YAY!  I’m sure there will be many more to come.

Read Full Post »

Older Posts »