Feeds:
Posts
Comments

Posts Tagged ‘retro’

For Christmas I made a necklace for my big sis inspired by a sweet little something I saw on ModCloth.  It was a super easy project and I was really happy with the way it turned out so I decided to make myself one as well.  🙂  Merry Christmas me.

Here is the ModCloth necklace for $20:

My DIY’d knockoff turned out just as well I think.  The great thing about this project is that you don’t need jewelry making tools (or skills really).  All you need to do is basically sew a chiffon ruffle onto the back of some glitzy costume jewelry.  And voila!  But just in case you’re still feeling anxious about it, I’ll walk you through the process with a little tutorial.

Cost:  $5-$6 (depending)

Supplies:

  • A glitzy rhinestone necklace.  I found mine for $5 at Walmart on clearance.
  • A scant amount of chiffon in the color of your choice.  You can buy chiffon by the yard or ask around for scraps as this doesn’t take much.
  • Thread in a matching color.
  • A needle.
  • Sharp scizzors.
  • Straight pins.

1.  First thing to do is lay out your chiffon.  You’re going to want about 2 or so strips stacked on top of each other.   The easiest way to do this is to fold your chiffon a few times and cut into 3″ or so wide strips.  Then, just unfold them and lay them out.  *TIP*  Make your strips about twice as long as the “fancy” part of your necklace.

2.  Now, stack the strips on top of each other and fold them in half long ways (hot dog way).  It is best at this point to pin them together so that they will stay put while you sew.  Now, sewing by hand, sew a straight, wide, stitch trough the top of your folded stack (about 1/4″ inch below the fold).  Start pulling the chiffon down the thread to gather and make a chiffon ruffle.

3.  Once you have made your ruffle.  This is about what you should have.

4.  The only thing left to do is to sew your necklace to the front of your chiffon.  *TIP* Don’t worry about the strips being cut perfectly straight.  As you can see from the image above, the varying lengths give it a loverly layered look like in the ModCloth version.

5.  Find the end of your “fancy” part on your necklace.  Hold it in place on top of your chiffon (about 1/4″ from the fold) and sew from back to front, securing the necklace in place on top of your ruffle.

6.  Keep sewing on your necklace until you get to the other end of your “fancy” part.  (And yes, that is the technical jewelers term).  If you have leftover ruffle at the end, just snip it off.

7.  If you’d like you can apply fray check to the edges of the chiffon but I prefer to leave them raw and let them fray a little for that shabby chic effect.

There you go!  A great little ModCloth knockoff for half the price!

And of course I said I made one for myself as well…

Not too shabby.  Now I just need a cute little something to wear it with…

🙂

Read Full Post »

Are you guys ready for some lovin’?  😉  If not, check out some of these last minute Valentine’s Day cards, signs, printables, and crafts.  So FUN aren’t they?!

V’day card from EnormousChampion.

These adorable Love Bug Valentine’s would be great for the little ones.  Find the bugs at the Dollar Store and get the jar printable at Dandee.

Martha Stewart knows how to really rock the card making!  I love these and they’d be especially easy with a dye cut machine.

This is a fabulous idea for a man bouquet!  Heather over at How Does She? made an ingenious bouquet out of mens socks for her guy this V’day.  So great.  You could probably also do the same kind of thing with underwear or t-shirts or ties.

Bakerella made these darling and simple cupcakes for V’day.  So sweet and easy even I might be able to pull off whipping these up!

Want a funny card/geeky/sci-fi card?  Check this out from the Wallaroo on etsy.  LOVE it.

Or this adorable card from Rifle Paper Co.

Make yourself a freezer paper stencil (like My Girl Thursday) and hand paint this shirt for your wife (or hubby).  🙂

Make a sweet clay heart pendant with Mitsy of ArtMind.

Speaking of clay, you could always go back to my clay rose tutorial and make some adorable vintage inspired rose rinds, earrings, or even refrigerator magnets for the special ladies in your life.

I saw this on Pinterest (follow me on pinterest if you’d like) and thought it would be another great freezer paper (or applique) project!  Spice it up a little bit tomorrow night!  😉  Or, if you’re NOT in the mood, create the other side to say “In Your Dreams”.

And of course, if you have a chance, doll yourself up and take some pin ups!  Your sweety will LOVE them! 🙂

I hope you all have a FANTABULOUS VALENTINE’S DAY!!!  See you back here in a few!

Read Full Post »

Well I have been getting a lot of feedback on my newly redesigned master bedroom (thank you for all the nice comments!) and so I thought I’d better get the headboard tutorial up for those of you who are interested in DIY-ing one yourself.  This isn’t so much a tutorial on how to build an upholstered headboard (there are plenty of tutorials out there on that) but more how I handpainted the chevron-ikat pattern onto my plain white headboard fabric.   Since I’d never done anything like this before, I pretty much guessed my way through it so my headboard is far from perfect.  To be honest, I’m thinking about completely repainting it with my leftover fabric.  But, lucky for you, I can walk you through what I did right AND WRONG and you can learn from my mistakes and make yourself something beautiful.  The best part is you can use this fabric painting technique to paint anything, headboards, pillows, chairs, t-shirts, whatever.

Cost: Varies by project.  Mine cost about $18 for the fabric and paint

Supplies:

  • White or other light colored fabric.  I used 2 yards of white cotton twill (from Walmart for $5/yd) for my headboard.  Natural fabrics work best and allow the paint to bleed a little bit.
  • Craft paint in your color choices.  I used a limey green and a tealy blue.
  • Textile Medium.  To mix with the craft paint to make it soft like fabric paint.  (Or you could just save yourself this step and buy fabric paint instead).
  • A medium sized flat/square tipped craft paint brush.
  • A spray bottle with water in it.
  • A water bowl to rinse brushes.

Okay then.  Heres what I did:

1.  I first upholstered my headboard in the white fabric by staple-gunning the fabric around to the back of the padded headboard.  Then I layed my headboard flat on the table to start painting.

2.  Next I got a square tray I had (you could also use a right angle ruler if you have one) and trace the corners of it onto my headboard lightly with chalk.  DON’T use chalk to do this.  It sucked up my paint wherever it was and made some really distinct paint lines that I don’t love on the finished project.  You could try a pencil or just dots of the paint color you’ll be using to give you the guide you need.  I’ll be honest though.  I did this only for the top portion of my headboard and then got lazy and didn’t do it to the rest.  I wish I would’ve though because some of my lines got whompy because I was winging it without a guide.  Thats what I get for being an impatient crafter.

3.  Next, working in small sections, spray the fabric lightly with water.  I would recommend testing the amount of water you need to be spraying with the amount of bleeding you want to get on a scrap piece of fabric before you try this on the real thing.  I didn’t do this and learned as I went.  I got the right hand side of my headboard pretty soaked and then learned that “less is more” and so the left side has less bleeding (which I like better).  You probably only need to spray a section two maybe three times and no more.  You don’t want the lines to become tie-dyed looking, but you do want the colors to bleed slightly into eachother.

4.  Now, holding your brush so that the square tip is on its side (or that the tip of the paintbrush looks like a vertical line), dip your brush into the water and then into the first paint color (after mixing it with the textile medium per the instructions on the bottle).  Then follow your guide using up and down choppy strokes on your fabric.

5.  When you have a section done, switch colors and do the same thing with the next color except push that color into the first color a little bit.  You may have to give it a squirt with the water bottle if the fabric has dried.

6.  The ikat-ness of the design is dependent on how you’re holding your brush so practice first on a scrap piece until you feel like you’re getting the look you want.  Then paint your piece (in my case an upholstered headboard) alternating between wetting the fabric with the squirt bottle and painting on the lines in an up and down stroke.  (You can see in the image below where I wet the fabric too much and the paint bled a little more than I would’ve liked.)

And thats what I did!  I would like it much better I think if I did it again and really took my time.  But, hey, not too shabby for a first try I guess.

Anyway, hope you enjoyed the tutorial!  Learn from my mistakes and go do your own! 🙂

Read Full Post »

The kids were down for naps and I had just hung up and put away all the laundry which meant everything I own was accessible.  I started looking around my closet with that really proud feeling that you get when you have NO DIRTY LAUNDRY.  You need to relish it because of course it won’t last long.  Anyway, I suddenly got the urge to try on outfits and see what I could come up with out of my wardrobe.  So, I thought I’d take pics so I can remember the ones I like.  So heres my little fashion show!  🙂  If you’d like to know my TOP 10 THRIFTING TIPS go here.

So what do you think of my dyed skirt, spray painted shoes, and thrifted threads?  🙂  I love my happy little closet.

P.S.  To see the black bib necklace tutorial go here.

Read Full Post »

I walked into my master bedroom a couple weeks ago and thought, “BLECH.”.  Not that I haven’t loved the black and white neutral color scheme, I just got tired of it.  I blame it on the quarter-life crisis I seem to be going through.  I have been feeling very anxious and OLD and have been itching to mix it up a bit in my life.  I would do what I always do when I feel like this and just go and do something drastic to my hair, that usually seems to do the trick, but I PROMISED my hubby I would grow my hair out and wouldn’t cut it until it was about “boob length” (his words).  So, after flipping through my “Happy Chic” book by Jonathan Adler (it is so fun and dramatic),

I decided to spruce up my room with a younger, funkier, Jonathan Adler meets Domino Mag (I miss you Domino) vibe and some really happy colors. The problem, like usual, is that I don’t have much of a decorating budget so I had to get creative and try to use what I have as much as possible.  I knew the first thing I wanted to do is change the wall color.  I decided to keep it neutral and lighten it up so I went with a light gray.  This decision was also largely based on the fact that I happen to have a bunch of leftover gray paint from Peyton’s room that I knew I could lighten up and use.  I also knew I really wanted to make the walls come to life so I decided to take it one step further and paint subtle gray horizontal stripes on 3 of the 4 walls.  I thought this would be a BIG time consuming job, but it actually wasn’t that bad.  And the lines came out really crisp, even on my textured walls, thanks to this tutorial I found over at Living With Lindsay.  I did this all by myself so I imagine it would be much easier with a helper.  I figure my husband will be less annoyed by my constant redecorating if he doesn’t have to do any of the work, so I do things while hes not looking so he can be amazed at the result later! 😉  Anyway, my stripes are 11.5″ wide.  I simply measured from the baseboard up 11.5″, then marked it, and measured up another 11.5″, marked it again, so on…until I had marked off the whole 3 walls, putting marks every 4 feet or so.  Then I just layed the tape on the wall as straight as possible from mark to mark.  I’m sure its not perfect, but I’m impatient.  I think it turned out pretty dang straight actually.  I left the tall wall, opposite my bed, stripeless because A. The weird ceiling line would’ve made the stripes look off at the top, and B.  I decided to put bookshelves against that wall that would pretty much cover it anyway.

Well, I’ll just show you the pics and walk you through the rest of what I did….

As a reminder, heres what my master bedroom looked like before:
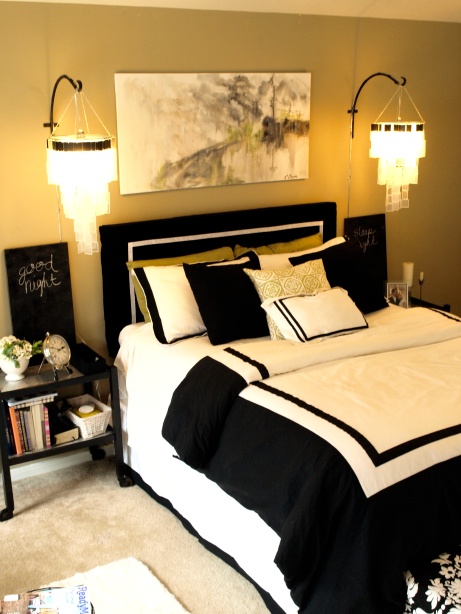
And heres what it looks like now!  SO much more fun and fresh I think.  And it definitely is a better reflection of me and Mr. Hubby’s style:

Didn’t the stripes turn out great?  I super love the subtle little FUN they bring to the walls.  So obviously with practically NO budget I kept all the original furniture.  The first and most noticeable upcycle is probablly the DIY’d ikat chevron headboard.  Yup.  I made that baby.  I looked and looked for cheap fabric that I liked and just couldn’t find any so I hit up Walmart’s fabric section and found some great white cotton twill.  Then all it took was a little craft paint, mixed with some textile medium, and a bit of creativity.  To be honest, I like but don’t love it.  I was too impatient and so my lines are a bit whompy.  I have leftover fabric so I might just do it again.  I dunno.  Anyway, the tutorial on that is coming soon if you want to paint your own!  (I’m sure you’ll learn from my mistakes and do a better job!)

I was happy to keep my lime green chairs and create a pallet around them so I distributed pops of green around the room.  But I also LOVE tealy-blue and threw that in there too, spray painting the nightstands, and adding other teal accents around the room.  Then I wanted just a little bit more so I added in just a few PUNCHES of tangerine orange.  It was tough to break out for my “4 colors in a room” box but I figured since gray, black, and white are really just neutrals in the background, 3 more fun colors wouldn’t hurt.  🙂

The black frames used in the pic above I got from BigLots for $5 for 2 (I also saw the same ones at Joann’s for $20 for 2 so I got a killer deal).  I just wrote on some canvas panels the letters to spell “ME” and “YOU” and flanked the room with them to fill up all the extra wall space surrounding my bed.

I debated for a bit on what to hang above my bed.  I didn’t want anything too busy to compete with the vibrant headboard and striped wall.  I thought about putting the framed “Me” and “YOU” there but decided I wanted something a bit more simple and small.  Also, I was afraid Daniel would think the room was getting too girly so I thought I’d throw him one and macho the place up by stealing the antlers (thrifted and painted for $4) from Sawyer’s nursery and mount those above the bed instead.  (Don’t worry, I just replaced them with the Pinterest project from this post and my wire dear head looks great in there).  I LOVE them in here.  I think they float perfectly inbetween my DIY’d hanging lamps and give just that touch of bohemian but in a sophisticated way.  Daniel likes them too.  Mostly because he says, “The bedroom is meant for mounting.”  Haha!  😉

Okay, I just wanted to talk about these pillows really quick!  Little orange guy is just some fabric I have wrapped around a pillow right now but I will soon get to sewing.  But the big gorgeous fringed beauty I found the other day at Home Goods in the clearance section for $7.  YES  $7.  You can’t even buy a down pillow form at the fabric store for $7.  I just love it.

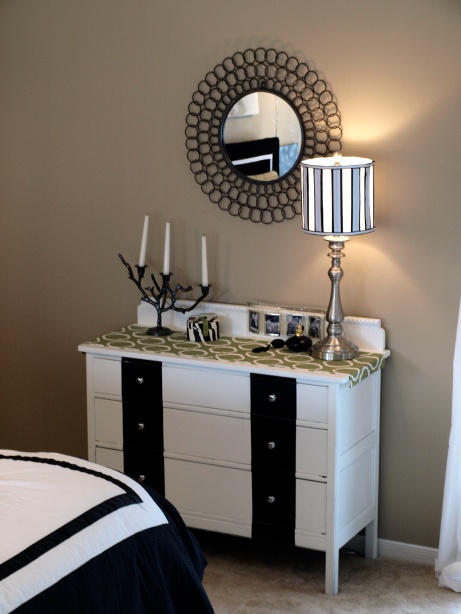
This is all pretty much the same.  I still want to do something more to that dresser.  Not sure what though, but it works great the way it is too.  The little teal lamp was on sale at Target for about $20.  The picture frame was also a Target buy on clearance for $2 as well as the new duvet cover set that was (my big splurge) about $60.

Above is a quick look from the other side of the room.  Below is a look at my bookcase wall that once was my gallery wall.  I ordered the white bookshelves from Walmart (in store they only had the 11″ deep ones and I wanted the 9″ deep ones) for $35 each.  They did site to store so I didn’t have to pay any shipping.  Originally I wanted to back them with some fun fabric or wallpaper (probably something black and white to allow the decorative accents to pop) but once I assembled them and got them up I realized I rather like them backless with the gray wallcolor showing through.  I’m not sure if I’ll leave them this way or decide to go ahead and back them, but here they are for now.  I’m still working on the styling, but heres the gist:

I am also debating on building legs for my shelves to stand on to make them look a bit more custom and give them more height on my tall wall.  I dunno.  I’ll probably just be too lazy. 🙂  Most of the accent pieces on the shelves were things I already had although I did pick up a few colorful vases and such at Hobby Lobby (50% off) and Ross.  I probably bought about 6 things all under $6 each.

And thats pretty much it!  I LOVE my new colorful funky room, and so does the hubby which is always a plus.  😉  I also mixed up some leftover paint from Sawyer’s nursery and am going to be painting my master bathroom shortly in a tealy-blue color.  Of course I’ll post it when I get to it!

A completely new look for under $300!  So happy.  So chic. 🙂

Read Full Post »

I HATE drama.  Except when it comes to fashion and design.  Then I LOVE drama.  And I’ve been meaning to make me something dramatic for a while now.  I think this loverly black bib necklace does the trick!  I’ve been loving bib necklaces for quite some time, especially the versatility of them.  Embellished shirts have been wildly popular but can also be somewhat spendy.  A great bib necklace is just the way to add a great embellishment that is temporary and looks almost like it is part of your top.  So heres what I did…

Cost: About $8

Supplies:

  • Beaded embellishments.  I found my 3 star/flower embellishments at Walmart in the craft department for about $2.50 each.
  • Black felt.
  • Scrap fabric.  I used leftover black chiffon.
  • Chain and necklace findings, or you could use black satin ribbon as the tie.
  • Scizzors.
  • Hot glue gun and glue.
(Sorry, the pics aren’t great because I took them with my phone.)
1.  Find a layout that you like with your beaded embellishments.  Lay them out on your felt.
2.  Cut around the embellishments, leaving about a half inch to an inch of felt on all sides.
3.  Cut your scrap fabric into thin strips (about a half inch or so wide).
4.  Begin hot gluing your fabric strips to the felt bib piece, twisting and squiggling the fabric around the spots where the embellishments will go.
5.  Hot glue your embellishments into place (the edges of the embellishments should be overlapping the twisted fabric portion of the bib so you can’t see any empty felt).
6.  I ended up giving my bib a bit more shape by cutting around the embellishments a bit more instead of just leaving the bib as a big “smiley”.
7.  Cut small holes in both ends of the bib to attach the chain/ribbon to.
8.  Attach the necklace portion to the bib with jump rings.
Thats it!  You’ll be amazed at how many things you can wear this with!  I wore it the other night at my mother-in-laws suprise party with a simple black and white striped tshirt and cute green skirt and it completely transformed the outfit.  I’ll have to get pics of that outfit up soon.  It really did look so cute with that striped shirt.
Have fun and remember, glue gun burns will fade, but your bib necklace will last for years! 😉
Update 10/26/2011:  Heres a pic with it on…

Read Full Post »

While at Walmart the other day, I quickly ran through their new-again fabric section.  Can we all collectively say “yay!” for Walmart bringing back the fabric department?!  Anyway, I was about to walk out (I was of course shopping with the boys again and they had already had enough), when I spotted this purple and red chiffon print peeking out of a pile of colorful fleece bolts.  I grabbed it to check it out really quick and loved it even more when I unrolled it a bit and saw the lovely native american-esque pattern.  I know.  I’m sort of becoming obsessed.  It kind of had the same feel as my maxi dress I just did (and LOVE) and when I saw that it was only $1.50 a yard I HAD to have some.  I didn’t know what I was going to do with it, but I got 3 yards and went on my little way.

Well, last night I pulled it out and took a look at it again.  I love the big oversized drapey t-shirts and ponchos I’ve been seeing on Urban Outfitters and Anthropologie and such.  And my new chiffon draped so nicely.  So I drew up a little plan and decided to make a wispy, bohemian, poncho-shirt, or as I like to call it, my shoncho.  🙂

Heres what I did:

Cost: $1.50 (You only need about a yard of fabric for this shirt so check remnant bins to get some great chiffon for CHEAP).

Supplies:

  • About a yard of chiffon fabric (or other lightweight drapey fabric that you love).
  • Scizzors.
  • Pins.
  • Sewing machine.

1.  Refer to my little sketchy plan below.  It basically shows how to do it.

2.  Here are some extra tips.

TIP 1:  BE CAREFUL!  Chiffon is delicate and tears and frays very easily.  So be slow and steady when feeding it through the machine.

TIP 2:  I used the finished edge as the bottom of my shirt so I didn’t have to zigzag the bottom.  If your chiffon piece has a finished edge, utilize it to save you time.

TIP 3:  Don’t forget to zigzag stitch (or serge if you have a serger) the INSIDE seams as well as the outside raw edges so they don’t continue to fray.

And thats it.  This took me less than 30 minutes to throw together.  And I’m pretty happy with it.  🙂  What do you think?  You can make this.  And its great for FAT days.

P.S.  I also made the red necklace and the pink clip-in hair extension.  For more of my jewelry and accessories, see the Fashion Tutorials section on the sidebar. 🙂

Read Full Post »

My poor dining room table has been attacked.  Beads, findings, feathers, fabric...you can’t even see the table top anymore.  Honestly, I wish I could leave it like this all the time.  I’m so much more productive when all my gear is just stroon (is stroon a word?) about, standing at ready for me to dive in and make something whenever I get a spare minute or two.  We barely ever use the dining room and its got the perfect amount of table room and great window light for me to work on all my little jewelry bits.  My hubby complains though.  I have a craft room for crafts he says.  Hes right I guess, although really there isn’t enough light or table space in my craft room to get stuff done.  Its like I need a room to store all of my craft stuff, and another to make it all.  Actually, if I’m being honest, the perfect house for me would consist of like 6 “work” rooms.  An office for blogging, a jewelry making room with a giant table and rows of beads and findings, an art room, an interior design studio, a photography studio, and a recording studio (that ones just a bonus, my hubby always wants me to record my songs and stuff for him and I never do).  Maybe someday… maybe someday I’ll pair down on my hobbies!  Yeah right! 🙂  Anyway, in the meantime, the dining table will do, as long as I get her cleaned up every once and a while to please Mr. HunnyBuns.

Anyway, unfortunately for my hubby and our table, I’ve been up to quite a lot this past week or so.  I’ve been having a blast making jewelry nonstop whenever the kids go down or while they’re playing by themselves.

Here are all the things I’ve made:

The necklace below was inspired by this design that I saw on Pinterest:

And heres mine, made out of an old t-shirt and wooden beads:

And heres a great tutorial on knotted fabric beading if you want to make your own.

I also saw this necklace on Anthropologie and was inspired to make my green and gray knot necklace below.

And here is my necklace using a similar technique.  I used prestrung seed beads from Walmart’s craft section so it made it super quick and easy to loop them together and attach the chain to the ends.  The little jewel is just a clip on earring I move around from necklace to necklace when I wanna glam it up.

I saw this on Urban Outfitters and was inspired to make my teal feather necklace below.

Heres mine.  I made mine a bit different but I LIKE MINE BETTER. 😉

I also saw this tutorial on Pinterest and made a jersey necklace like it from an old shirt and wooden beads.

Heres mine:

Thats all I have time to show you right now!  But come back soon!  I have TONS more! 🙂

Read Full Post »

I’ve suddenly become obsessed with making clothes.  I blame it on Pinterest and all the adorable ideas I’ve been exposed to.  In one of my lives (lets pretend we get lots) I would love to be a fashion designer.  *Sigh*  Instead though, I have been breaking out my sewing machine and pretending I’m one.

Don’t get me wrong though.  I seriously am NOT a seamstress.  I know very little about sewing actually and I never follow patterns.  I don’t know if I even know how to read patterns.  I just sketch ideas out as they come or try to figure out how to make things based on other items I’m inspired by.  This is why my little sewing tutorials are relatively easy.  Because I don’t think I could pull of anything much harder.

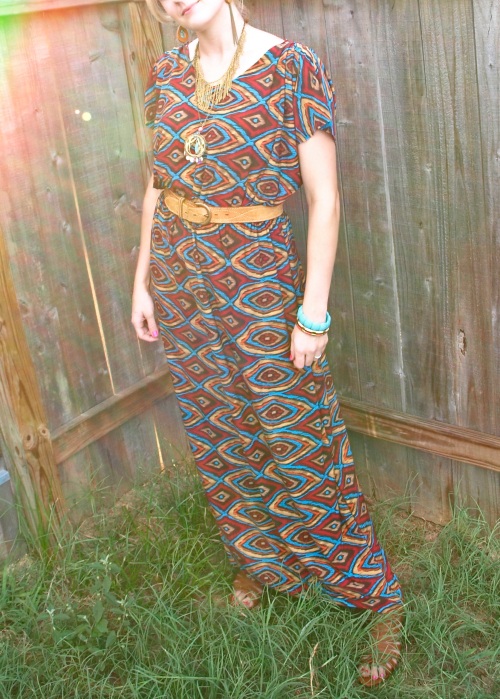
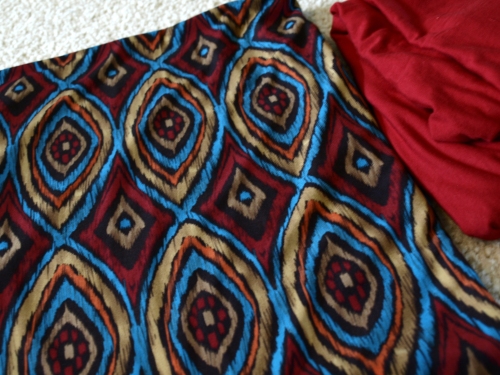
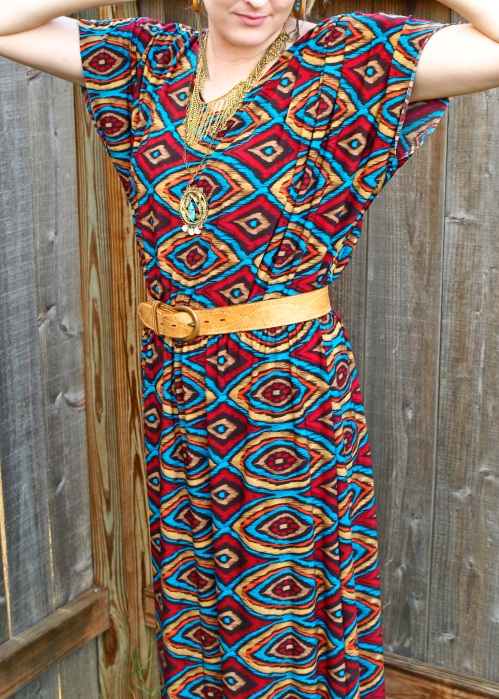
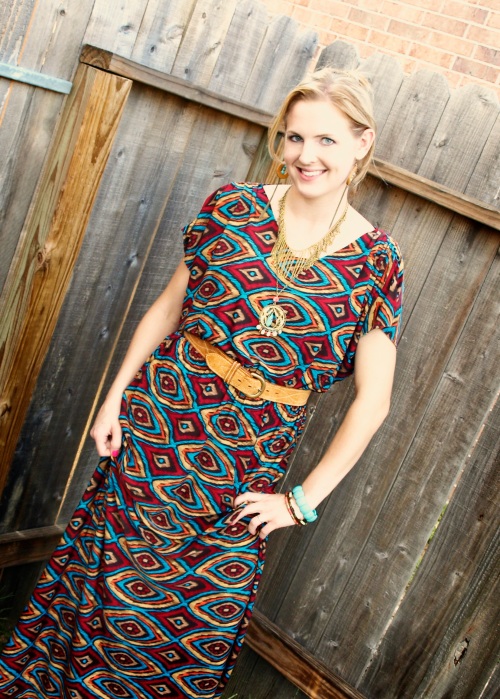
When I do get the itch to sew something, I usually turn to jersey fabric or a stretchy knit.  This stuff is so easy to work with and doesn’t fray so hemming edges isn’t necessary unless you want it to be.  I went to the fabric store the other day in search of a fun print in a knit to make a maxi dress after becoming obsessed with the kimono style maxi dresses I’d seen on Pinterest and Etsy lately.  I took both my boys, and quickly perused the options in between shoving cookies into my screaming 14 month old and reprimanding my 4 year old for unrolling bolts of fabric down the aisle.  Ugh.  Can I just say how much I HATE shopping with my kids.  By the way, any tips on that matter would be appreciated!  Anyway, I found this colorful, kind of native american-esqu, ikat-ish print that I loved and lucky for me was 40% off.  I got 3 yards for $23.  Enough to make my maxi dress and a little whatever-else-I-feel-like-making later.  Anyway, this is a really easy dress and I’m pretty happy with how it turned out!  Hope you like it and have fun making your own!

Cost:  About $23 or so depending on the fabric

Supplies:

  • 2 and a half yards or so of stretchy knit fabric
  • Coordinating thread.
  • Elastic for waistline.
  • Pins.
  • Sewing machine.
  • Scizzors.

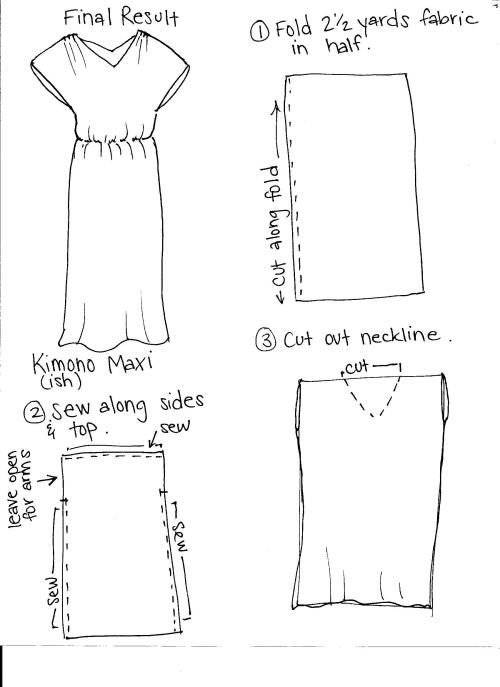
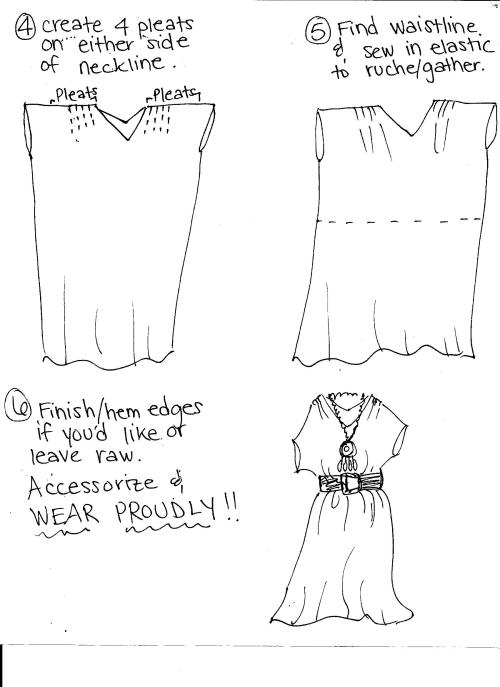
1.  Refer to my little sloppy sketches below that kind of walk you through it.

2.  The sketches pretty much lay it out for you but I’ll give you some extra tips.

  • TIP 1:  Try this on a lot as you go to make sure its fitting you well.  OR, take a maxi or long dress you already own and find the proper length for your new dress from that.
  • TIP 2:  Leave at least 12 inches open at the armholes when you sew up the sides, if you want less of an opening, you can always sew up more of the armhole after you try it on.  P.S.  When sewing, sew right sides together and use a knit stitch (or zigzag stitch) on your machine to allow the fabric to continue to stretch.  Careful not to pull the fabric as you are sewing to avoid rippling.
  • TIP 3:  Cut the neckline by folding the dress in half and cutting a half V on the fold.  This way the neckline will be symmetrical.  Also, cut the neckline pretty conservatively at first.  Since the fabric has stretch it will widen/deepen when you put it on.  You can always cut more from the neckline after you try it on and gauge how deep/wide you’d like it to be.
  • TIP 4:  You can omit the pleating if you’d like along the shoulder area at the neckline.  I just through that on mine for solely decorative reasons.  If you don’t know how to make a pleat, google it.  Its super easy and quickly adds a little “fancy” to any design.
  • TIP 5:  Cut a strip of elastic long enough to wrap around your waistline.  Make it slightly longer than you think you’ll need.  You can always cut the excess off when you’ve sewn it into your dress.  Refer to this post for more tips on sewing in elastic waistlines.

3.  Throw it on when you’re done and accessorize in an oh-so-bohemian-chic kind of way and be proud of your work!

GO DO IT!!  🙂

Read Full Post »

I have been crafting like crazy lately, and my house shows it.  There are fabrics, beads, dyes, and odds and ends EVERYWHERE.  I LOVE IT.  It means I’ve done something.  It also means I have one RIDICULOUSLY huge mess to clean up.

Every once in a while I’ll hit a huge surge of creative juices.  Maybe I’m manic.  Or just A.D.D.  Probably both…  ANYWAY, I hit one of these surges around the middle of last week and have been having quite some fun indulging my crafty side.  I feel quite productive.

Probably my most favorite thing I made this past week was this little mustard number I refashioned from a frumpy long white skirt that I got as a gift a while back and NEVER wore.  Not even once.  I’ve been addicted to this site I found recently called Weardrobe and have been in love with all the mustard yellows I’ve been seeing in the fashion world.  So, I went into my closet, in an attempt to create me something MUSTARD.  I saw the skirt and thought, “Hmmm.  I’m sure I can do something with this”.  And I did.  And I love it.

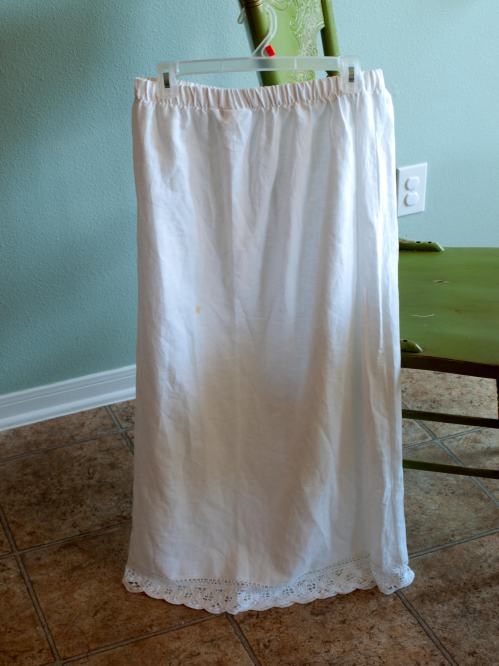
Heres a look at it before:

Heres what I did.

Cost:  About $6  (for the dye)

Supplies:

  • A long skirt.  Preferably pretty straight.
  • Sewing machine.
  • Elastic
  • A long piece of scrap fabric (for the necktie).
  • Brown and yellow RIT dye.  (Find it in the laundry detergent section at Walmart).  I used the liquid kind.
  • Sewing machine.
  • Thread.
  • Scizzors, pins, etc.
Okay!  This is really super easy and I know you’re dying to make it so here are the instructions! 🙂
1.  Refer to my little diagram below.  Sorry, I know its kind of dark.
2.  Basically, you just want to fold your skirt in half and cut off the waistline (mine was elastic) and then cut from the waistline down to the side to create armholes.  Its worth it to throw it on after you cut off the waistline and get a feel for how wide you want your neckline and how large to make your armholes.  Another way to do it is use a tank top you already have as a guide, although you may still need to adjust it a bit.  Make the neckline area a little wider than you would like.  It will be gathered by the necktie in the end.
3.  Next you want to hem all your raw edges you’ve just created.  I don’t own a serger (dangit) so I just zigzag stitched the edges and then folded them under and straight stitched (on the armholes only) about a quarter inch.
4.  The next thing you’ll do it create a pocket at the neckline for the sash/necktie/whatever-you-call-it to go through.  Just fold under about 2 inches or so and straight stitch the bottom of the fold.  *TIP* Be aware of the fabric that you’re working with.  You might need to zigzag stitch the whole thing if you’re working with stretchy fabric.  Mine was linen.
5.  Now you need to make the necktie with your scrap fabric.  I had a cut up old white sheet I used.  I simply made a long sash by cutting out about a 5 inch wide strip and then folded it in half (right sides together) and stitching it together along the edge.   Then I turned it right side out and stitched up the ends.  Then feed it through the neckline pocket you made with both ends coming off to one side in the front.  *TIP*  Use a large safety pin attached to the end of your necktie to feed it through the pocket easily.
6.  Now, put on your dress.  It will look kinda like you’re wearing a potato sack with a cute little bow.  Find where you’d like to create a “waist”  and pin that area on each side.
7.  Next, take it off, and mark with straight pins (or a fabric chalk) straight across to the other pin to make a straight waistline guide.
8.  Next, wrap a long piece of elastic around your waist at the same area wear you pinned on your dress.  Find the size/tension that you like and cut the elastic to that size.
9.  Now, sew the elastic onto your dress following the waistline guide you’ve created (turn the dress inside out again and sew the elastic on the inside of the dress).  To sew elastic so that it gathers the fabric (also known as ruching), start off by tacking the elastic down (preferably on a side seam) and then pull on the elastic to stretch it a bit as you slowly stitch it to the fabric.  Practice on scraps first if you have never done this before.  You’ll get the hang of it.  Try to keep the same amount of tension on the elastic through the entire waistline so that it gathers evenly.
AND THATS IT!!  You’ve done it!
Now just follow the dye instructions (if you ARE dyeing) to create a new custom color.  For my mustard yellow color I mixed about 1/4 the bottle of brown dye in with the full bottle of yellow dye and then added it to steaming hot water (about 3 gallons).  It took very little time (about 15 minutes) for my skirt to reach the color I wanted.  Then I simply rinsed it out in cold water and laundered it as usual.
What do you think?  Easy right!?  I’m IN LOVE.
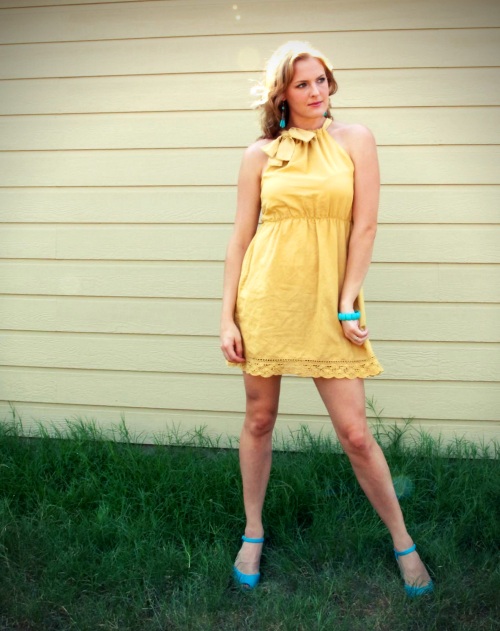
Since its a billion and one degrees here you could still wear it like this:
I love the yellow with the pops of teal for summer.
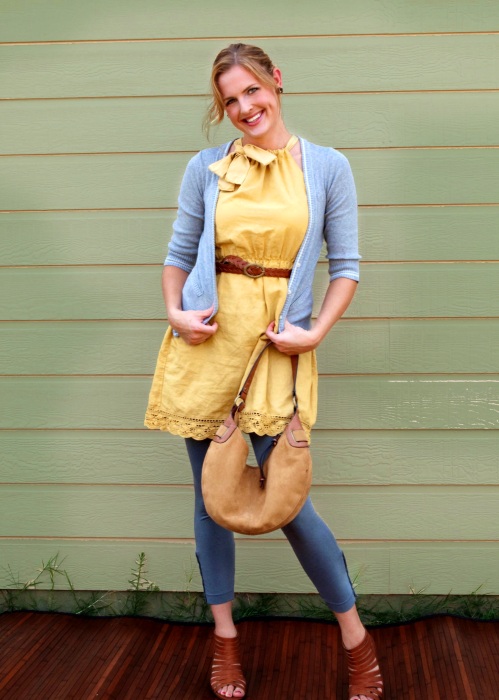
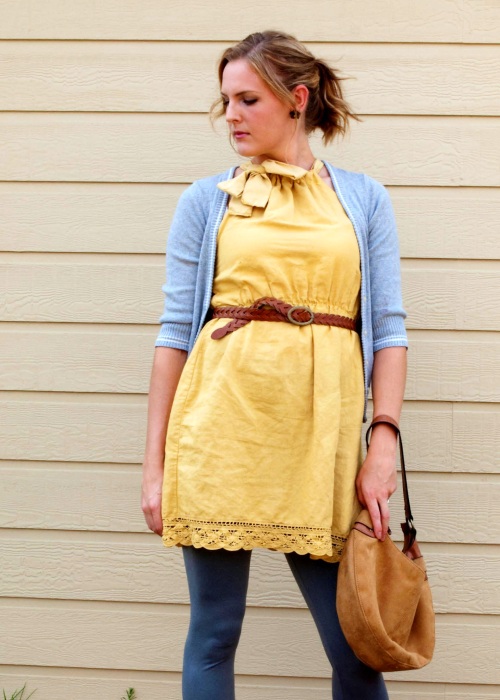
Or, when it starts cooling down, wear it like this:

Mustard yellow, grey, and pecan.  Yummy.

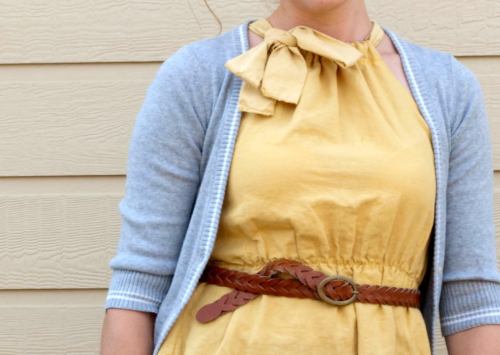
Heres the BEFORE and AFTER again:

Read Full Post »

Older Posts »